
CSV Import bulk-creates and updates user accounts from a comma-separated values file. It is ideal for initial system setup, periodic batch updates, or environments where a directory service is not available. Accounts are matched to existing users by their login, so re-importing an updated file keeps records in step without creating duplicates.
How CSV Import Works
When you start an import, OptimiDoc reads the file, skips any row that is missing a given name or surname, and then, for each remaining row, matches it against existing CSV-imported accounts by login:
-
If no matching account exists, a new user is created with the credentials supplied in the row.
-
If a matching account exists, its fields are updated from the row.
-
Departments named in the file are matched by name, and created automatically if they do not yet exist.
CSV import never deletes accounts — the "Deleted" figure in the result is always zero. Only directory sources (Active Directory, Azure AD, Google Directory) remove accounts that have disappeared from the source.

Navigating to CSV Import
-
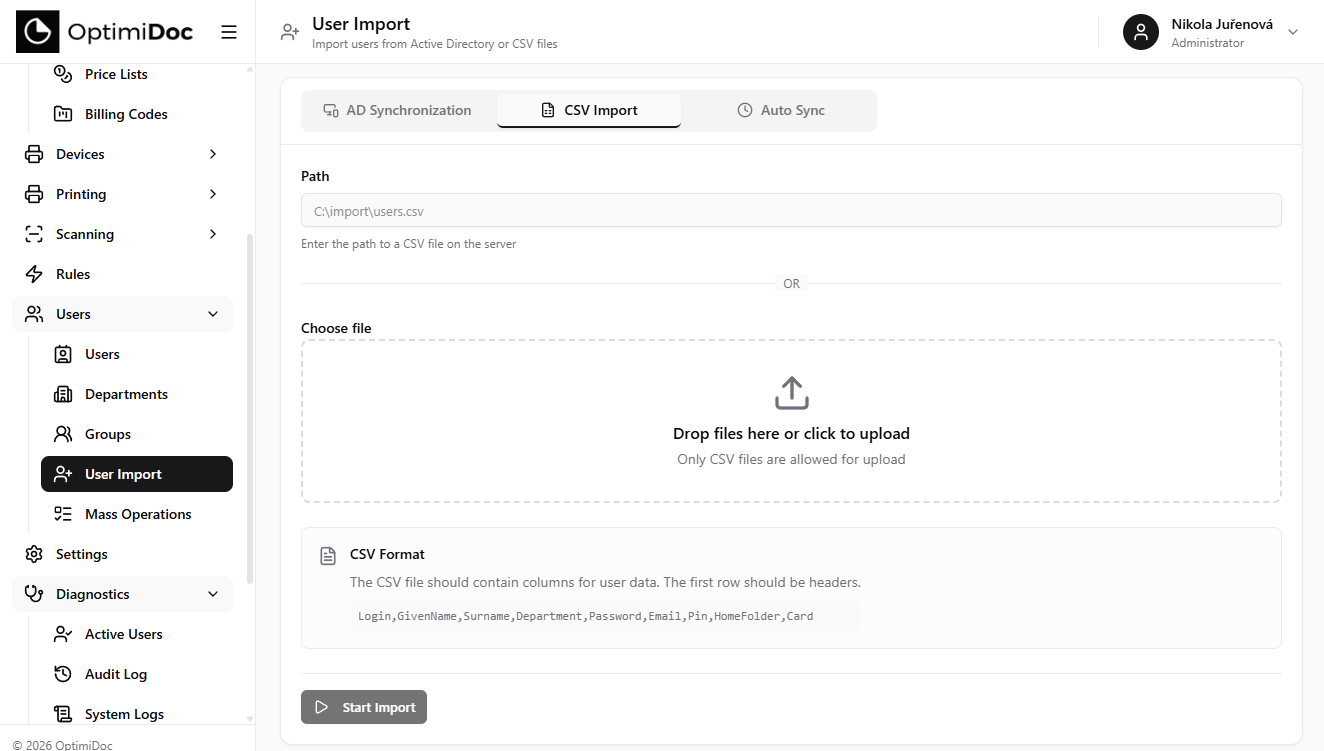
In the left sidebar, expand Users and click User Import.
-
Click the CSV Import tab.
Preparing a CSV File
The file must meet the following requirements:
-
The first row contains the column headers.
-
The file is encoded as UTF-8.
-
Fields are separated by commas (
,); values containing a comma are enclosed in double quotes.
Supported Columns
The header names below are matched to the account fields (case-insensitively). To avoid parsing errors, include all of the columns in the header row and fill in only the values you have.
|
Column |
Description |
Required |
|---|---|---|
|
|
The login name. This is the key used to match and update existing accounts, so it should be unique. |
Recommended |
|
|
The user's given name |
Yes |
|
|
The user's surname |
Yes |
|
|
Department name (created automatically if it does not exist) |
No |
|
|
Initial web/Windows login password for newly created accounts |
No |
|
|
E-mail address |
No |
|
|
Numeric PIN for MFP panel authentication |
No |
|
|
Network path used as the user's default scan-to-folder destination |
No |
|
|
A card number for contactless MFP authentication (one per row) |
No |
Given name and surname are required: any row missing either value is skipped and not imported. This mirrors the "import incomplete users" behaviour of directory sources, which is always off for CSV.
Example CSV Content
Login,GivenName,Surname,Department,Password,Email,Pin,HomeFolder,Card
jsmith,John,Smith,Sales,,john.smith@example.com,1234,\\server\home\jsmith,ABC001
jdoe,Jane,Doe,Marketing,,jane.doe@example.com,5678,,ABC002
bwilson,Bob,Wilson,IT,,b.wilson@example.com,,,
Importing via File Upload
-
In the CSV Import tab, locate the file upload area.
-
Either drag and drop a CSV file onto the upload zone, or click the zone to open a file browser.
-
Only
.csvfiles are accepted; the selected file name and size are displayed. -
To change the file, click the X next to the file name and select a new one.
-
Click Start Import to begin.
Importing via Server Path
If the CSV file is already stored on the OptimiDoc server:
-
Enter the full file path in the Path field (for example,
C:\import\users.csv). -
Click Start Import.
Note: The path field and file upload are mutually exclusive. Selecting a file disables the path field, and vice versa.
Monitoring Import Progress
Once the import starts:
-
The Last Import Result card at the top of the page shows the current status with a progress bar.
-
Status messages describe the current operation (loading rows, creating and updating accounts).
-
When the import finishes, the result card reports:
|
Statistic |
Description |
|---|---|
|
Inserted |
Number of new accounts created from CSV rows |
|
Updated |
Number of existing accounts updated |
|
Deleted |
Always zero for CSV imports |
A success or error notification is displayed when the import completes.
Handling Existing Users
When a row matches an existing account (same login from a previous CSV import):
-
Changed fields — name, surname, department, e-mail, PIN, card, home folder, password — are updated.
-
A value left blank in the file clears the corresponding credential that was previously set by CSV import; credentials entered manually or supplied by a different source are not affected.
-
Uniqueness is enforced for login, PIN, and card values: a row whose PIN or card would clash with another user is reported and that value is skipped.
Troubleshooting
|
Issue |
Solution |
|---|---|
|
File rejected on upload |
Ensure the file has a |
|
Nothing is imported (0 inserted / 0 updated) |
Check that the header row uses the exact column names above and that each data row has a |
|
Parsing error mid-file |
Include all supported columns in the header row, even if some are left blank |
|
Characters display incorrectly |
Save the file with UTF-8 encoding |
|
Department not found |
Departments are created automatically; check for typos in department names |
Related articles