
This quick-start guide shows you how to create your first print connector in OptimiDoc Server, using a monitored folder as the print source for pull printing. A print connector is a source that OptimiDoc collects print jobs from; the simplest is a Folder connector that watches a network share.
How Print Connectors Work
In the React UI, print connectors and scan destinations share the same underlying infrastructure — a connector is simply a destination configured as a print source. That means creating one is quick: you pick a type, fill in its connection settings and decide who may use it. Jobs collected by the connector become waiting print jobs that users release at any device where they authenticate (pull printing).
Before You Begin
Ensure you have:
-
A shared network folder (or a local folder on the server) that will hold the print files.
-
File-system permissions for the OptimiDoc service account (or the credentials you supply) to read the folder.
-
At least one device registered and installed in OptimiDoc for releasing jobs.
Creating a Folder Print Connector
-
Navigate to Printing → Print Connectors in the left sidebar.
-
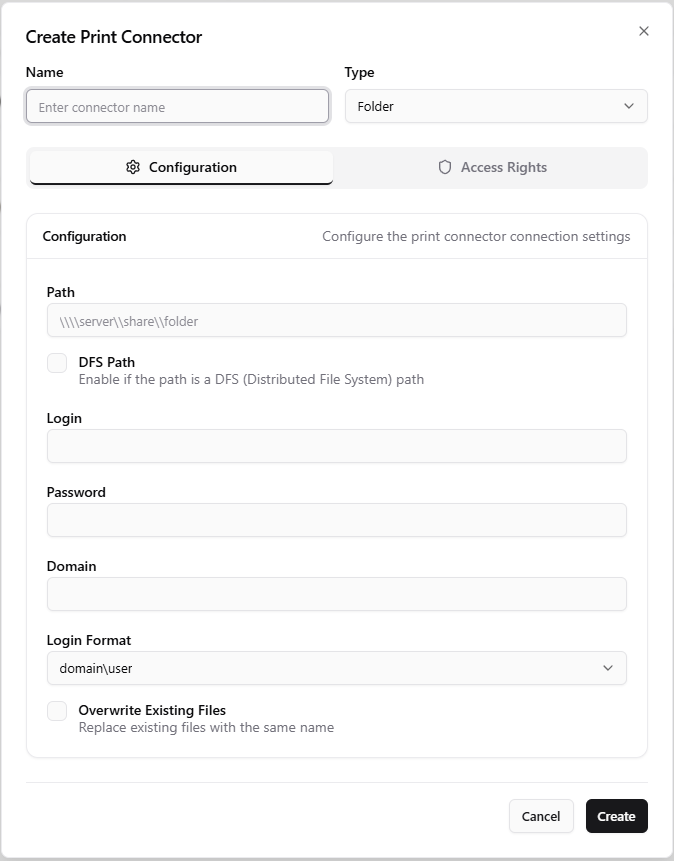
Click the Add button. The connector form opens with the type preset to Folder — the most common print source.
-
Enter a Name — a descriptive label (e.g. Accounting Print Queue).
-
Configure the Folder connection settings:
-
Path — the full path to the folder (e.g.
\\server\share\accountingor a local path). -
Login, Password and Domain — supply these when the share requires authentication; leave blank to use the OptimiDoc service account.
-
Is DFS — enable when the path is a DFS namespace.
-
NetUse user format — choose
domain\useroruser@domainto match how the file server expects credentials. -
Overwrite — controls whether existing files of the same name are replaced.
-
-
Under Access Rights, either enable the connector for everyone or select the specific groups that may use it.
-
Click Create to save the connector.
Testing the Connector
-
Place a test print file into the monitored folder.
-
In OptimiDoc, navigate to Reports → All Jobs.
-
The job should appear in the list with the status Waiting.
-
Authenticate at a device terminal — the job should appear in the user's pull-print list ready for release.
If jobs do not appear, confirm the path is reachable and that the supplied credentials can read the folder.
Other Connector Types
OptimiDoc supports several print-source types beyond Folder. Choose a different type in the connector form to configure one:
|
Connector |
Description |
|---|---|
|
Print attachments from a monitored mailbox. |
|
|
Print files from Google Drive. |
|
|
Print files from Microsoft 365 storage. |
|
|
Print files from other cloud and WebDAV storage. |
|
|
Collect jobs from a Windows shared print queue. |
For driverless printing, OptimiDoc also offers named IPP queue connectors — printers that users add directly on their workstation and print to over IPP, with the queue's print defaults configured on the Driverless Print (IPP) page. For the full list of print sources, see Print Connectors Overview.
Related Articles
-
Print Connectors Overview — all connector types
-
Driverless Print (IPP) — print without installing drivers
-
Quick Start: Add a Device — register a device for pull printing
-
Quick Start: Create a Scan Workflow — set up scanning