
This quick-start guide explains how to add your first multifunction device to OptimiDoc Server, configure its terminal behaviour, and install the embedded terminal application. OptimiDoc talks to the device over SNMP for discovery and monitoring, and installs a vendor-specific embedded application that presents the OptimiDoc login and menus on the device panel.
Before You Begin
Ensure the device is powered on, connected to the network, and reachable from the OptimiDoc server. You will need:
-
The device's IP address or hostname (the address field accepts either).
-
The device's administrator credentials (used to install the embedded application).
-
The appropriate SNMP profile (v1/v2c community string or v3 credentials). A default SNMP configuration is provided out of the box.
Adding a Device
-
Navigate to Devices in the left sidebar.
-
Click the Add Device button in the top-right corner.
-
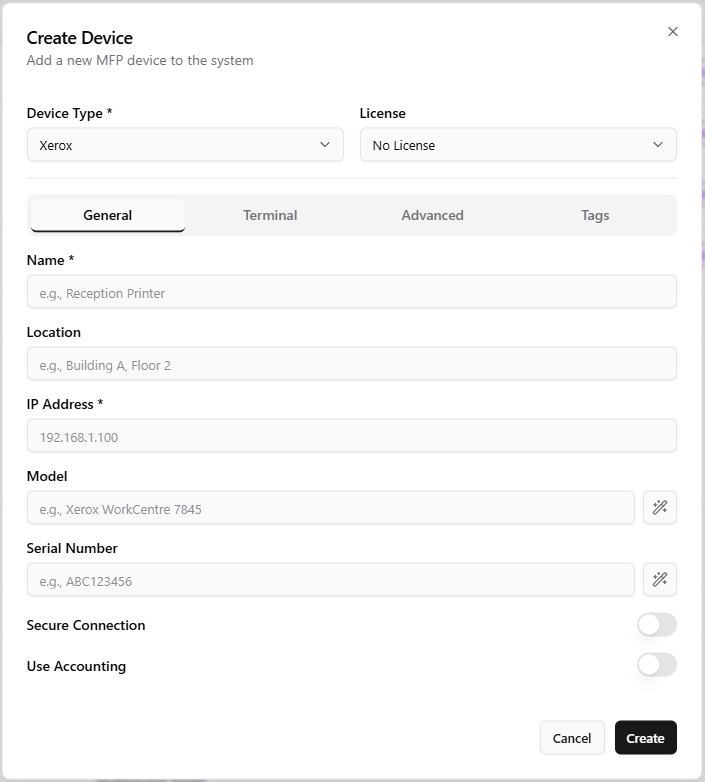
At the top of the form, choose the Device Type (vendor). The available options are Xerox, HP Enterprise, HP Pro, Konica Minolta, Develop, Lexmark, Epson, Ricoh, Canon, Kyocera, Fiery and generic Network Device. The chosen vendor determines which tabs, licence options and terminal settings appear, and some field labels carry vendor-specific hints.
-
On the General tab, fill in:
-
Name — a friendly display name (e.g., Reception Printer).
-
Location — optional physical location description.
-
IP Address — the device's network address or hostname.
-
Model and Serial Number — optional. Click the wand button beside each field to detect the value automatically from the device over SNMP.
-
-
Click Save to register the device. A new device is created with the default SNMP configuration already selected, so it can be monitored immediately. If the IP address is already used by another device, OptimiDoc rejects the save with a localised error.
Configuring Terminal Behaviour
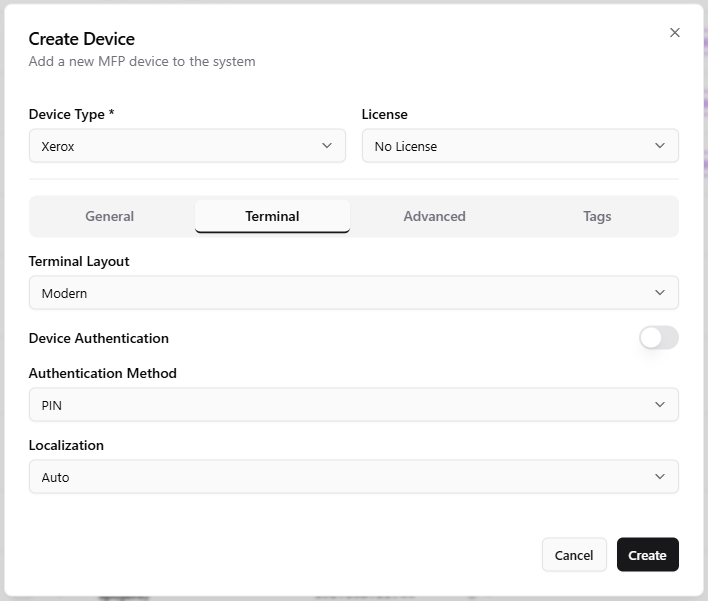
Open the device and switch to the Terminal tab to control how users sign in at the panel. The settings available depend on the device type:
-
Terminal Layout — the panel style used by the embedded application.
-
Device Authentication — enable to require users to sign in at the device.
-
Authentication Method — how users identify themselves (for example, PIN, card, or login and password). The available methods depend on the selected vendor.
-
Card Assignment, Localization and Display Settings — fine-tune card self-enrolment, panel language and the landing screen, where the vendor supports them.
-
Click Save.
The device's own administrator login and password, the SNMP Configuration selector, the delivery type and application-registration options live on the Advanced tab.
Installing the Embedded Application
-
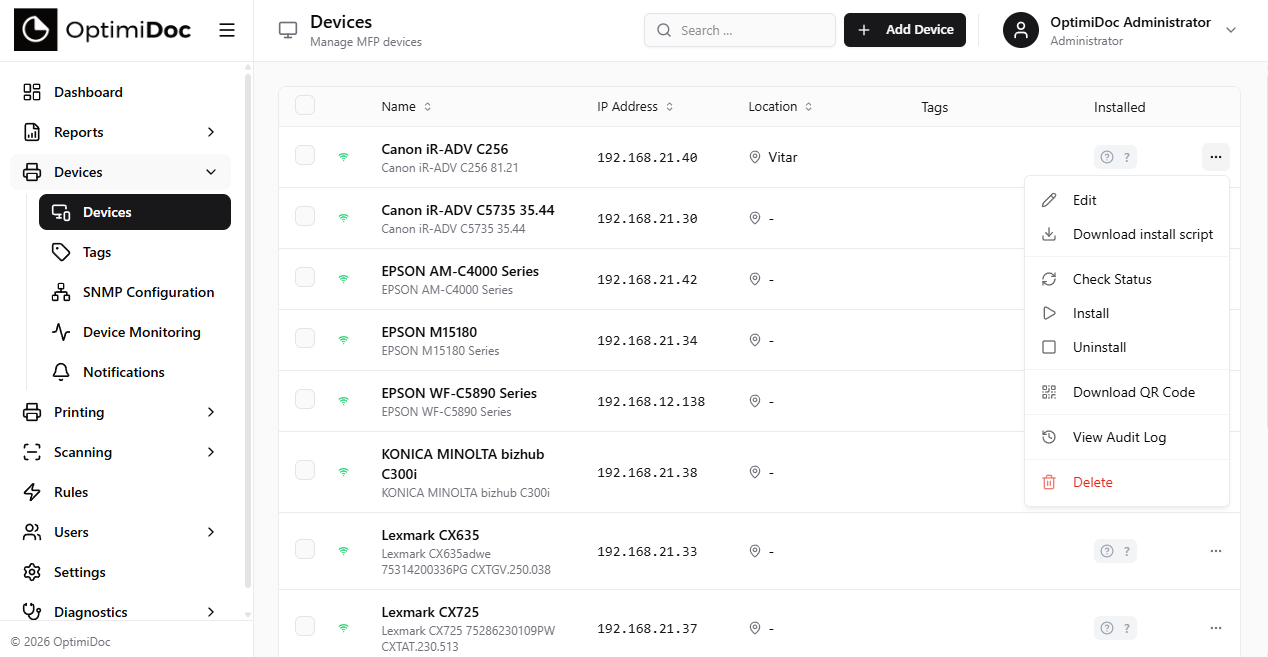
From the device list, click the actions menu (three dots) next to your device.
-
Select Install to deploy the OptimiDoc terminal application to the MFP. Installation pushes the current SNMP configuration to the device as part of the process.
-
Wait for the installation to complete — the Installed indicator turns green when it succeeds. Installation is a long-running operation and is not retried automatically, so let it finish.
-
Optionally, select Check Status to verify the device is communicating with the server.
Verifying the Device
After installation, verify the setup:
-
On the MFP's touch panel, the OptimiDoc login screen should appear.
-
A user can authenticate by tapping an ID card, entering a PIN, or typing their login and password.
-
In the OptimiDoc web console, the device should show a green Installed indicator in the Devices list.
Troubleshooting
|
Issue |
Solution |
|---|---|
|
Device shows Offline |
Check network connectivity and verify the IP address or hostname is correct. |
|
Model or serial auto-detect returns nothing |
Confirm the device is reachable over SNMP and that the selected SNMP configuration (on the Advanced tab) matches the device's SNMP settings. |
|
Installation fails |
Verify the device administrator credentials on the Advanced tab and check firewall rules between the server and the device. |
|
"IP address already in use" on save |
Another device is already registered with this address. Locate and edit the existing device instead of creating a duplicate. |
|
Login screen not appearing |
Ensure the correct Device Type is selected, then reinstall the embedded application and restart the MFP. |
For detailed troubleshooting, see Device Communication Failures.
Related Articles
-
Managing Devices — full device management guide
-
SNMP Configuration — configure SNMP profiles
-
Quick Start: Add Users — create user accounts
-
Quick Start: Create a Print Queue — set up your first print connector