
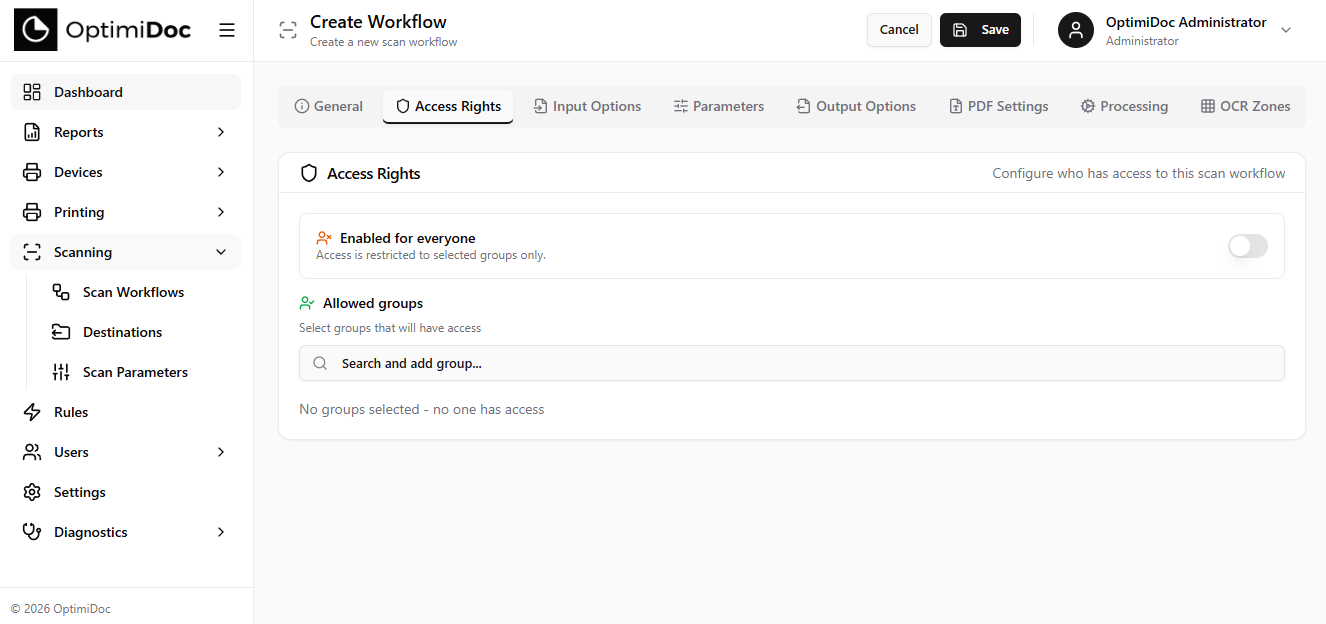
The Access Rights tab controls which users can see and use a scan workflow. Access is managed entirely through user groups: a workflow can be available to everyone (optionally excluding certain groups) or restricted to a chosen set of groups. This is the same group-based access model used by scan destinations and billing codes, so permissions behave consistently across OptimiDoc.
How It Works
Access is expressed as a single decision — Enabled for everyone — plus a list of groups that either extends or narrows that decision. There is no per-user assignment: everything is done with groups, which keeps permissions easy to maintain as people join and leave teams. A live summary line at the bottom of the tab always tells you exactly who ends up with access, so you can see the effect of your choices before saving.
The Two Access Modes
Enabled for everyone (on)
When the Enabled for everyone toggle is on, every authenticated user can see the workflow. The group list below then becomes a list of Denied groups — an optional exclusion list. Add a group here to take access away from its members while everyone else keeps it.
-
With no groups added, the summary reads "No groups denied — everyone has access".
-
Use this mode for general-purpose workflows that should be broadly available, with the occasional exception.
Enabled for everyone (off)
When the toggle is off, access is restricted. The group list becomes a list of Allowed groups — only members of the groups you add can see the workflow.
-
With no groups added, no one has access, and the summary warns "No groups selected — no one has access".
-
Use this mode for department-specific or sensitive workflows (for example an HR archive) that only selected teams should reach.
Selecting Groups
Groups are added through a search box rather than a long checklist, so the control scales to organisations with hundreds or thousands of groups:
-
Click Search and add group… to open the group picker.
-
Type part of a group name — results are searched on the server as you type.
-
Click a group to add it. It appears below as a removable chip.
-
To remove a group, click its chip (it turns red on hover) or reopen the picker.
The special Everyone group is represented by the toggle itself, so it never appears as a chip in the list.
Where Groups Come From
OptimiDoc user groups can originate from several sources, and all of them can be used here:
-
Local groups — created and managed within OptimiDoc.
-
Active Directory / LDAP groups — synchronised from your directory service.
-
Microsoft Entra ID (Azure AD) groups — imported via the cloud directory integration.
A user must belong to at least one allowed group — and to no denied group — for the workflow to appear in their list.
Common Scenarios
|
Scenario |
Configuration |
|---|---|
|
Workflow for all employees |
Leave Enabled for everyone on, with no denied groups. |
|
Available to all except contractors |
Enabled for everyone on; add the "Contractors" group to the denied list. |
|
Finance department only |
Enabled for everyone off; add the "Finance" group to the allowed list. |
|
Several departments sharing a workflow |
Enabled for everyone off; add each department group to the allowed list. |
|
Executive-only confidential scanning |
Enabled for everyone off; add a restricted group containing only those users. |
Best Practices
-
Prefer group-based access over ad-hoc arrangements — it is far easier to maintain as staff change.
-
Review access periodically, especially after organisational changes.
-
For workflows with sensitive destinations, switch Enabled for everyone off and grant access to a specific group.
-
When piloting a new workflow, restrict it to an administrator or test group first, then broaden access once it is verified.
Related articles